Project: Transferring a file between two folders
(This artical is mainly to the developer who is new to BizTalk Server applications.)
The objective is to create an application in BizTalk administrative console and setting up to receive an XML from one location and send that XML file to a different location.
Scenario: If an XML file come to a folder, the BizTalk Application has to pickup that file and place it into a different folder. For that you need to do the following steps.
Steps
(This artical is mainly to the developer who is new to BizTalk Server applications.)
Before knowing BizTalk Server architecture design and its components in details, lets see a very simple project
and then we will continue to learn BizTalk Server components.
Introduction
In this artical, I will teach you to how to create a very simple project to receive & send a file between tow
folders. It may sounds very simple but most of the time in enterprises systems a file (mostly XML formatted
file) being transferred and manipulated by different businesses by their applications.
The objective is to create an application in BizTalk administrative console and setting up to receive an XML from one location and send that XML file to a different location.
Scenario: If an XML file come to a folder, the BizTalk Application has to pickup that file and place it into a different folder. For that you need to do the following steps.
Steps
- Create two folders "Source" and "Target" in "C:\BizTalk\Lab1" (create this root folder if dose not exists)
- Create an XML file.
- Open "BizTalk Administrative Console" and create an application in the name "FileController"
- Setup RECEIVE and SEND ports to point to the folders created in step 1.
- Set a filter settings in SEND port to transfer that incoming XML file to "Target" folder.
- Open Windows Explorer and point to C: drive
- Create a folder in the name of "BizTalk" (ignore if already exists)
- Go into the folder "BizTalk", and create a folder in the name of "Lab1" (ignore if already exists)
- Go into the folder "Lab1" and create two folders inside in the names of "Source" and "Target"
- Open notepad and copy paste the below XML content
- Save the file in the name of "SampleData.xml"
<?xml version="1.0"?>
<catalog>
   <book id="bk101">
      <author>Gambardella, Matthew</author>
      <title>XML Developer's Guide</title>
      <genre>Computer</genre>
      <price>44.95</price>
      <publish_date>2000-10-01</publish_date>
      <description>An in-depth look at creating applications
      with XML.</description>
   </book>
   <book id="bk102">
      <author>Ralls, Kim</author>
      <title>Midnight Rain</title>
      <genre>Fantasy</genre>
      <price>5.95</price>
      <publish_date>2000-12-16</publish_date>
      <description>A former architect battles corporate zombies,
      an evil sorceress, and her own childhood to become queen
      of the world.</description>
   </book>
</Catalog>
Creating an Application in Administrative Console:
- Start the
application "BizTalk
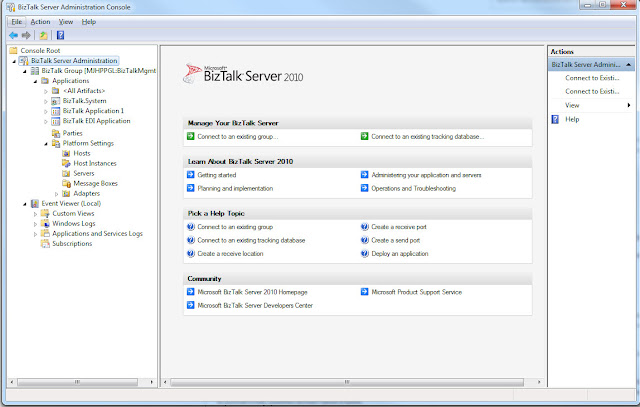
Administrative Console" by clicking on "Start > All Programs > Microsoft BizTalk Server 2010 > BizTalk Administrative Console". Note: Click on "Yes" if a dialog box with a question "Want to run under admin
account?" This administrative console will look alike
this
- Expand the Applications node and right-click on that node to create new application.


- Specify the application name as "File Controller" and click "OK" button to create application

Note: Now you can see newly created application (File Controller) under applications list
Creating Receive Port: This section explains that how to configure the source folder (from where the files are coming in to BizTalk) via adapter. The BizTalk File Adapter has in-build capability of picking a file on its arrival automatically and sends to its subscriber (the process and/or port which register to receive that file). To configure receive port, do the following.
- Expand "File Controller" application and select "Receive Port" node to create new receive port.
- Right click on "Receive Port" and choose "New > One way Receive Port". Specify the port name as "SourceFileReceivePort".

- Select the "Receive Locations" on left-hand side options and specify the folder which we created in step 1.
- Click on "New" receive location
- Give the receive location name as "SourceReceiveLocation"
- Change the Type to "File"
- Leave receive handler (BizTalkServerApplication) & receive pipeline(PassThruPipeline) to default selected value.
- Click on "Configure" button and specify the values as given below and click "OK"
- Receive Folder -> "C:\BizTalk\Lab1\Source\"
- File mask -> "*.xml"
- Retry count -> "5"
- Retry interval (min) -> "5"
- Click "OK" button in Receive Location Properties dialog box.
- Click "OK" button in Receive Port Properties dialog box.
- Now we have created and configured a receive port & location

Creating Send
Port: This section
explains how to configure the send port to store the incoming XML file into target location. Just follow the
instructions below to create a send port
- Select the "Send Ports" on left-hand side options in the nodes list under "File Controller" application.
- Right click on "Send Port" and choose "New > Static one-way Send Port". Specify the details given below
- Name -> "TargetFileSendPort".
- Type -> "File"
- Send handler -> "BizTalkServerApplication"
- Send pipeline -> "Pass Thru Transmit"

- Click on "Configure" button and specify details as given below
- Destination folder: -> "C:\BizTalk\Lab1\Target"
- File name -> "SourceFile.xml".
- Copy mode -> "Create New"
- Click on "OK" button on FILE Transport Properties dialog box
Setting Filters on Send Port: This section explains how to transfer the file from Receive Port to Send Port. In this, we need to map the receive port in send port's filter settings. To do this, follow the instructions given below
- Click on "Filters" on the left- hand side options and specify the settings as given below. Note: If you have closed the SendPort Properties dialog box accidently, just open the dialog box again by selecting Send Port -> <Newly created send port>'s properties
- You will see a grid on right-hand side with columns Property, Operator, Value and Group By
- Click on "Property" column of the first row and select value "BTS.ReceivePortName".Automatically the "Operator" cell will be populated with "=="
- Select the "Value" cell in the grid and specify the Receive Port name which we created (not port location name). In our case, it is "SourceFileReceivePort".

- Click on "OK" button on Send Port Properties window.
Starting newly
created application:
Now its time to run the application. All the applications in BizTalk server are required to be started before we use them. Follow the instruction to start the application.
Now its time to run the application. All the applications in BizTalk server are required to be started before we use them. Follow the instruction to start the application.
- Right-click on newly create application "File Controller" and select "Start".
- Click on "Start" button again on the dialog box.
Note: To check whether application is
running, click on the "Applications" node. Then you should see a green color play icon for the
application "File Controller" with status "Started" on right-hand side pane.
Testing "File
Controller" application:
Now its time to test the application. Place the XML file (SampleData.xml) in Source folder and that file should disappear. Open the Target folder and you should see that XML.
Note: To retest, delete the file from Target folder before testing the app.
Conclusion:
This is a very simple application to step into BizTalk Server. In the next topic we will see in more details about BizTalk 2010 fundamentals for developer.
Previous Post: Installing and Configuring BizTalk Server 2010


.jpg)
